In this video, we discuss the different preparation designs for Emax and gold onlays, temporisation and the cementation and bonding protocol including immediate dentine sealing!
This is a summary of the full webinar presented by Dr. Kushal Gadhia on Student ACE courses. If you are a student, you can sign up to watch the full webinar among loads of other webinars on topics such as occlusion, periodontics, dentures and much more by following this link: 🌐 https://www.students.ace-courses.co.uk/
Preparing the onlay
With the advances in adhesive materials in the last few decades, we’re quickly moving towards more conservative dentistry and with that, onlays should be preferred over full coverage crowns in most scenarios. Dr. Gadhia says that he rarely finds the need to place a crown over an onlay and usually only places them when there is a need to replace an old crown.
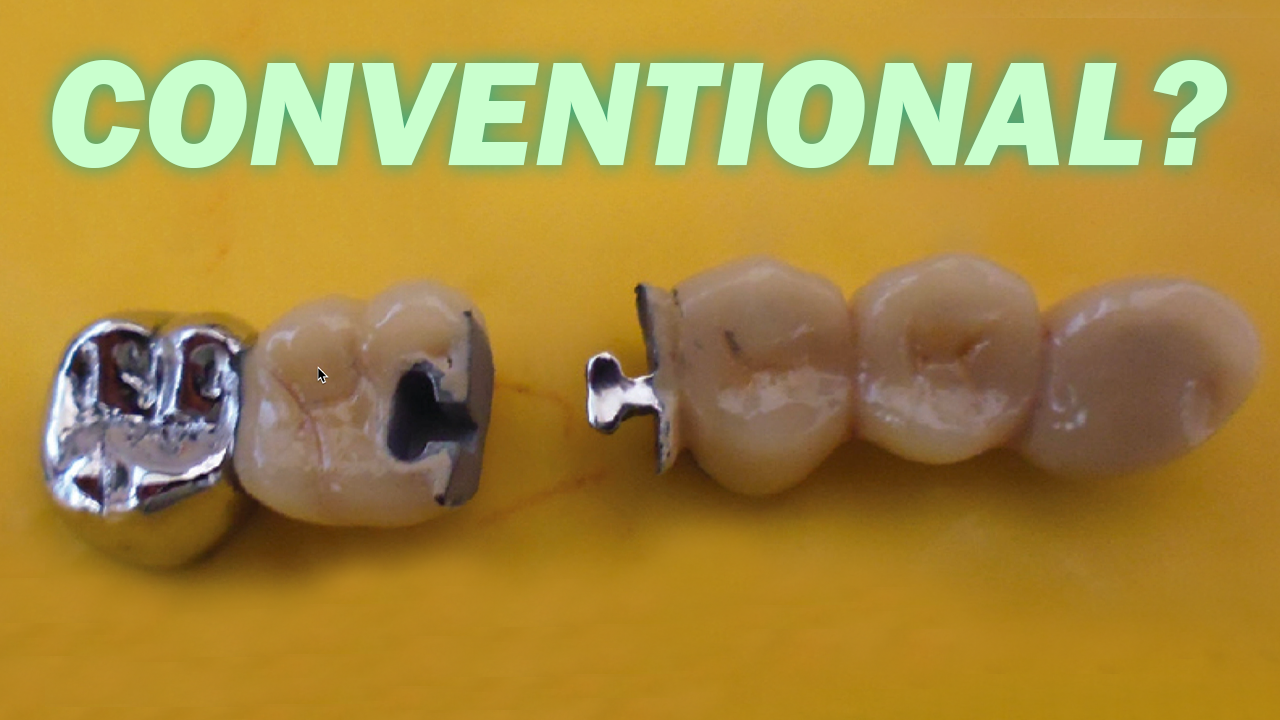
You can pause the video now to have a look at the different preparation finishes and their corresponding appropriate materials. There are, generally speaking, 4 categories of onlays and so 4 different preparation designs. We can prepare a tooth for an MOD gold onlay, an MOD Emax onlay, an adhesive emax onlay or a heat treated gold onlay. The first 2 are for conventional cementation and the last 2 are to be bonded.
For an MOD gold onlay, we need retention and resistance form, we need boxes, we need the minimum depth and width of your isthmus’, and on the functional cusp, we’ll need that protection from a chamfer and a butt finish with a little bevel over the non-functional cusps.
For an MOD Emax onlay, you would do this if you didn’t have the needed 90% of enamel remaining that you would need for an adhesive Emax onlay. The prep is almost identical to an MOD Gold onlay but the difference is that all edges need to be round so that you can reduce any points of stress. You’ll also need a much heavier chamfer on the functional cusp and a butt finish on the non-functional cusp. The obvious advantage here is that it will be more aesthetic than gold.
For an adhesive Emax onlay, you’ll need at least 90% of the enamel remaining around the tooth and there is no specific preparation design for this type of restoration and it depends on the presentation of the tooth and where it’s fractured. Here are a few different design examples but again we need rounded edges and no sharp angles.
Finally for bonded heat treated gold onlays, the preparation is very similar to adhesive onlay preps but you don’t need as much reduction for the chamfers around the edges. You want to do your occlusal reduction and if there are any old restorations, you can remove them and incorporate that space into the onlay. Also try to make your chamfer follow the contour of the tooth for a more aesthetic result as shown by one of Dr. Gadhias photographs on the screen now.
It’s also important to note that when you’re preparing a tooth which is in the visible aesthetic zone when the patient smiles, especially an upper premolar, it’s really easy to see the buccal margin between the onlay and the tooth if you prepare to the middle of the buccal wall. Instead, do an ultra-conservative preparation, it will be less obvious and this would be acceptable because on the upper, the buccal is the non-functional cusp and so less forces will be acting in that area, so it doesn’t need as much reinforcement by a larger preparation. However, if you have a patient with a crack in the buccal cusp, then you should prepare the tooth a bit more aggressively to avoid crack propagation and fracture.
Once you’ve prepared the tooth, you should always place a resin seal in the same appointment. This is known as immediate dentine sealing or you might see it written as IDS. You etch for 2-3 seconds to identify the dentine from the enamel and you’ll see that the dentine will go glossy while the enamel will go frosty, and then you quickly wash and dry it. Then you selectively etch the glossy dentine for 10 seconds, or 20 seconds if it’s sclerotic, to roughen the surface of the dentine only and not the enamel. This increases the surface area and then you wash and dry it. Then you prime and bond, and this can be a 2in1 or can be done separately depending on the generation of bonding system you’re using (pause since I don’t know if I’ll include this) as shown on the screen now. You want to use a microbrush to massage it into the dentine for 20 seconds and then light cure it for 20 seconds. Then you apply an oxygen inhibiting layer like glycerine and light cure again for 20 seconds through the glycerine and wash it off. This is done because the very top layer of the resin is inhibited by oxygen in the air.
This process is known as IDS and it helps with sensitivity and bonding because the hybrid layer starts to mature over the 2 weeks that you’ll wait for your onlay to be made and therefore massively increases the bond strength. This of course will mean the restoration will last longer than it would have otherwise.
Provisional restoration
Now that you’ve made this strong hybrid layer between the dentine and the adhesive resin, you can make your provisional restoration. You can do this with any of the materials on the screen now and the reason you should make your temp before taking the impression is because the temp can tell you a lot about your preparation and what the final onlay will be like. If it’s too thin in areas for example, then at this stage you can adjust the preparation before taking the impression.
Once you’re happy with your temp, you can use some glycerine or vaseline to make sure your temporary doesn’t get stuck to the tooth and is more easily removable when you want to remove it again. Now you can cement that temp in place. The cement will depend on if the restoration will be held in mechanically or adhesively bonded. If it’s mechanically held, you want to use a non-eugenol zinc oxide cement like NE Temp bond. If you want something a little bit stronger, you can use poly F zinc polycarboxylate. This can also be used for cementing adhesive temporary restorations. An alternative for adhesive restorations can be spot etching the enamel, applying flowable composite, then locking the temporary restoration with flowable in the interproximal areas to hold it in place. If you opt for this option, make sure not to use any primer or bond so that the temp can easily be flicked off at the next appointment.
Impression taking
Before you cement the provisional in, you need to take your impression. This can be done either by using Polyvinylsiloxane or an intra oral scanner, and the use for retraction cord is usually not needed unless you have an aspect which is sub-gingival. Once the impression has been taken you would then you finish this visit by cementing the temporary in.
Onlay fit
After waiting a couple weeks for the fabrication of your onlay, on your next visit, you want to start by removing your temporary restoration. You can do this by getting an instrument in the margin and levering it, so it pings off. You could also tighten a sequveland matrix band to create pressure coronally and it can come off like that. You could also use an ultrasonic scaler and if all of these methods don’t work you can carefully cut it with a bur.
Then you want to try the onlay in and check your margins, interproximal contacts, static and dynamic occlusion and make any necessary adjustments. Once your happy with the restoration, if you’re not bonding, you can cement the onlay in, remove any excess and check the occlusion. The examples of cements you can use for mechanically retained onlays are Aquacem, Poly F Fuji plus or zinc phosphate.
If you’re bonding an Emax onlay, then the process isn’t as straight forward, you need to add a few extra steps and it must always be done under rubber dam. We’ll need to start by preparing the onlay for bonding and this is done by etching the fit surface of the onlay for 60 seconds with a 9% buffered hydrofluoric acid. This is a less concentrated version of the 5% hydrofluoric acid the lab would have used. Then we need to wash it off for 20 seconds and clean the debris that it leaves by brushing 35% phosphoric acid onto it with a microbrush for another 60 seconds and rinsing again with water for another 20. This is done to remove the crystalline debris and if you skip this step, the bond strength may reduce by 50%. If you want to take it one step further you can leave the restoration for 5 minutes in an ultrasonic bath filled with 95% alcohol.
At this stage, you MAY need to apply a primer to the fit surface of the restoration depending on the cement you’re going to use and which bonding system it requires. We spoke a little about the different generations of bond earlier but the idea is that some do all of the steps in one and other systems require each step to be done separately (there will be an image displaying the different generations of bonding systems and one will show up when I mention it earlier too – picture below but cleaner). If you’re using a self-adhesive resin cement, you can skip this step but it’s really important to follow the manufacturers instructions or your onlay will really quickly fail if it’s bonded incorrectly.
Now that the restoration has been prepared, we need to prepare the tooth itself. We need to re-activate the bond that we placed when we did the immediate dentine sealing on the tooth’s preparation surface at the last visit. We do this by sandblasting the preparation surface with 50 microns aluminium oxide and washing it off for 30-60 seconds. Then you want to etch the enamel for 30 seconds and the dentine for 15 seconds and prime and bond the surface; but it’s really important that you DON’T light cure the bond at this stage.
Now the Emax restoration and the tooth are ready to be joined together by the cement and there are so many to choose from. You can use a self-adhesive resin cement like rely-x, a dual cure cements like panavia or heated composite. Make sure you research the protocol for the one you decide to use to ensure the best bond strength.
Once you’ve cemented it, put pressure on the onlay for about 3 minutes and remove your excess cement using a sharp probe, super floss, PTFE tape, normal floss with a couple knots or even a tepe brush. You can get really creative in how you remove this excess cement. Finally you want to apply a layer of vaseline, glycerine, oxiguard or Ky jelly and cure through it to make sure you don’t get an oxygen inhibiting layer forming. Show your patient in a mirror and I’m sure they’ll be really pleased to see it.
📱 Follow Ace courses on Instagram: www.instagram.com/ace_courses
📱 Follow us on Instagram: www.instagram.com/two.dentists
Check out our other content
If you’re interested, feel free to check out our other Blogs, our Instagram page, or our YouTube channel for more.