If you prefer to watch videos, make sure to watch the video above as we discuss how to construct a dental treatment plan.
In this part of the educational series, we’re going to show you how to turn all the information from your history and examination into a well-structured dental treatment plan that you can follow.
The order to follow when treatment planning is the acute phase, prevention, stabilisation, definitive treatment and finally maintenance. This is the way we’ve worded it but your uni might name it slightly differently so just bear that in mind but as you read on, it will all make sense.
Acute phase
The first phase of any treatment plan should be the acute phase where you basically get the patient out of pain and you address any emergency or urgent problems.
So some problems need immediate attention and will need treatment on the same day, and these are Emergency problems like severe dental pain, swelling, systemic infection, or trauma to the face or jaw.
Whereas some problems don’t need immediate attention but you as the dentist or patient think hey should be attended to “now” or “soon” and these are the Urgent problems like mild to moderate pain without active infection, asymptomatic broken tooth, lost restorations, and other purely aesthetic problems like a small enamel fracture on an UR1. These are treatments that postponing won’t cause the patient unnecessary pain or risk of systematic illness.
This part of the treatment plan is often overlooked because when treatment planning we tend to start thinking about all the different restorative or perio problems but this acute phase is especially important when it comes to building a good rapport with your patients. Sometimes patients will come to the hospital or your practice only because they have no choice and they’re in pain. They might’ve been kept up at night by this pain and be really moody and may be fearful because they don’t know what treatment they might need. Now if you take a nice empathetic approach, find out which treatments are emergency or urgent, and you get them out of pain or fix their broken tooth, then you might have just turned an anxious patient who only comes in for emergencies, into someone who is willing to come back to the hospital or your practice so you can get the rest of the treatment plan done. This can be a massive way of attracting new patients to your practice and can help dental students get patients coming back so they can get their totals.
There’s loads of different emergency and acute problems and we’re not gonna bore you by going through them all, but there’s a table for you guys in the document below, listing out the most common acute problems and some treatment options for the short terms and the long term treatment implications.

Stefanac SJ, Nesbit SP. 2017. Diagnosis and Treatment Planning in Dentistry: Elsevier
Prevention
After the Acute phase of the treatment plan, you need to look at prevention. Prevention needs to be in nearly all treatment plans that you write. It should include oral hygiene instructions, fluoride, diet diary and advice. There is a public health England document called “Delivering Better Oral Health” and every dentist and dental student needs to have read this at one point. It covers everything you need to know for prevention and you can find it in the link below. In the modern age of Dentistry, we want to move away from having to constantly treat caries, to focusing on preventing caries from happening in the first place. This is why prevention comes before stabilisation or definitive treatment. You don’t want to start doing any perio treatment or filings if the patient is still not brushing their teeth properly or using the correct toothpaste because your perio treatment or filling might fail. So get it in as early as possible, ideally in the first appointment.
So when writing out prevention in the treatment plan, depending on their needs, I would write something like “Prevention: – Oral hygiene instructions, – diet diary and analysis, – Prescribe 5000ppm fluoride toothpaste”
Stabilisation
The next phase is the stabilisation phase and is kind of connected to prevention in the sense that we want to stabilise their dentition to prevent any of the current diseases from getting worse. The only time you don’t need a stabilisation phase in a diseased patient is when the definitive treatment phase will eliminate the disease anyway. Like a full mouth clearance on someone who has carious teeth who needs C/C dentures placed, there would be no point filling them.
The main areas you want to stabilise are caries, perio, pulpal or periapical and extractions of hopeless teeth with immediate gap replacement if needed. Now if patient requires ALL of those things, you can’t just do them one at a time because let’s say you just do perio, their caries might advance further. This is where the difficult part of treatment planning comes in and we’ll explain later how you can handle this. But for now, let’s explain each section in the order you should write it in your treatment plan, so you have a better understanding of what they include, and then we’ll explain how you can manage multiple sections at the same time.
Periodontitis
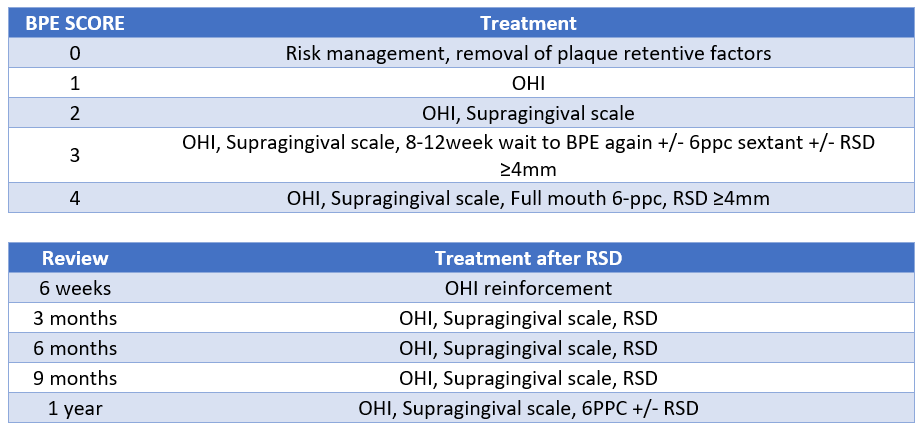
So the first section to mention is perio. The main thing you need to look at when writing out your perio treatment plan is the patient’s BPE.
If your patient has BPEs of 0s and 1s, they don’t have periodontal disease and their treatment is covered by the Oral Hygiene Instructions you would have noted in prevention. But you still need to consider their risk factors for having periodontal disease in the future. There’s a whole list of risk factors but the main ones are smoking, alcohol and diabetes. You need to assess and manage these risk factors for all patients, not just the ones with BPEs of 0s and 1s.
If your patient’s highest BPE score is 2, you would need to write “remove plaque retentive factors” and note their locations if it’s an overhanging restoration or a ledge but you don’t need to note down every tooth that has calculus because you would remove all of the calculus when you do a supragingival scale.
If your patient’s highest BPE score is 3, you need to write “initial periodontal therapy, including supragingival scale, OHI, review 8-12 weeks”. You could stop there, and most people do tbh, but ideally in your treatment plan you also note what happens at the review. So you could add “at review, if BPE remains 3 or is 4, carry out 6ppc and RSD pockets ≥ 4mm under local anaesthetic once OH adequate + 3 month review”.
If your patient’s highest BPE score is a 4, you should write “6ppc + RSD pockets ≥ 4mm under LA once OH adequate + 3/12 review”.
The reason you do perio before you do any definitive treatment, is because there’s no point putting in some beautiful crowns and then later down the line, the patient doesn’t clean the margins and their perio gets worse. At the same time, you need to use some common sense as to what is achievable for a particular patient. If someone’s OH won’t improve more than it’s current status, maybe because they have arthritis for example, then you should continue on with your treatment but possibly consider a less damaging option.
Assess restorability
The next section to include is checking uncertain teeth. Look at your chart and ask “are there any teeth which we’re unsure of their restorability?”. These are teeth which you will have to investigate further by removing caries and then assessing the options. Options might be filling, root canal treatment, crown or extraction. But you will only find out after you’ve removed the caries and can see the extent of it. You explain all of this to the patient and let them know the plan.
Caries
Next up is caries. You have look at your chart and ask yourself which teeth have caries. On one tooth, it might have just started and be in it’s really early stages which has become a white spot lesion; it could have become cavitated and be just into the enamel or just into dentine, or it could be deep into dentine and be encroaching on the pulp. Each of these require different treatments and you need to know which would be the most appropriate treatment and this is based on the extent of the caries.
If you see a non-cavitated carious lesion, you would treat that by applying fluoride varnish and monitor it to make sure it’s not getting worse.
If it was a larger carious lesion into dentine, you would need to drill away the caries and fill. At this stage you need to decide what you will fill it with and this can be a temporary material like GIC or RMGIC or a more mid-long term material like composite or Amalgam.
If the patient has a lot of caries, you want to stabilise them as soon as possible, so you can chose to stabilise with a temporary filling material like GIC because you can stabilise all of the caries quicker in fewer appointments. In that case, in your treatment plan you would write “stabilise with GIC” and note which teeth. Trying to fill all of these teeth with composites and amalgam would take too long and in that time, the caries might get much worse and then suddenly one of the teeth might need a root canal treatment.
However, if the patient doesn’t have a lot of caries and it’s only a few teeth, then you can place a mid-long term restoration like composite or amalgam. So in your notes you could write “Direct restoration” and note which teeth.
Pulpal and Periapical
Next on the list is pulpal and periapical tissues. This is where you look at your chart and radiographs, and see which teeth need root canal treatments. For example, on your chart you might have seen a carious LR6 and on the radiograph there was a big apical radiolucency and the tooth was also non-responsive to sensibility testing. All of this points to a need for root canal treatment. In your dental treatment plan you would write “UR6 RCT or XLA” and then explain the two treatment options to the patient and decide what they want.
Extractions
Next up is planning for extractions of hopeless teeth. This might be retained root or a grade 3 mobile tooth with over 90% bone loss.
Replacement of missing tooth or teeth during disease control phase
Lastly, you want to provide temporary solutions to gaps. There will be situations where you will need to provide the patient with a temporary solution while you carry out the rest of the treatment. This could be because they have a missing upper central incisor or, they struggle to eat cos they don’t have enough teeth in the arch. These kinds of problems can be temporarily fixed with a denture addition to an existing denture, or if they don’t have a denture, asking your lab to make a temporary partial denture.
How to actually do it!
So now we’ve covered all of the sections of stabilisation and there were quite a few, so how do you actually carry out all of this and which ones do you do first? One way of doing it is by carrying out quadrant dentistry. And this is where you look at all the stabilisation that is needed and you do it one or two quadrants at a time per appointment. Now you might think, well which quadrant should I start with? And that’s where you can decide as a dentist by prioritising which section needs to be attended to sooner rather than later. In general, treatment of deep cario lesions in vital teeth, symptomatic pulpal problems, and acute oral infections takes precedence over treatment for chronic periodontitis.
For example, let’s say you have a patient who has perio, that also needs fillings, a root canal treatment and an extraction of a retained root. Out of all of these, the main one that can become problematic if left for too long is caries. If you have a tooth that has deep caries then you should prioritise the quadrant with that tooth because if you leave it too long, the caries might reach the pulp and the tooth might then need a root canal treatment. So you start with that quadrant and in that appointment, you can do all the fillings in that quadrant and also carry out RSD on the pockets ≥4mm. The next appointment, you pick the second worst quadrant and do the same, you might then address the tooth that needs a root canal treatment and so on.
As you’re carrying out the perio, fillings and root canal treatment, you can talk to the oral surgery department to plan a date for the extractions. Once you have a date for the extractions, you can talk to the prosthodontics lab to have an immediate denture ready to be fitted after the extractions.
You can see how multiple sections of the stabilisation are handled at the same time, to ensure they happen in as few appointments as possible and in a way that you don’t neglect any section. The key is to prioritise and see which tooth needs attending to first, and start with that quadrant.
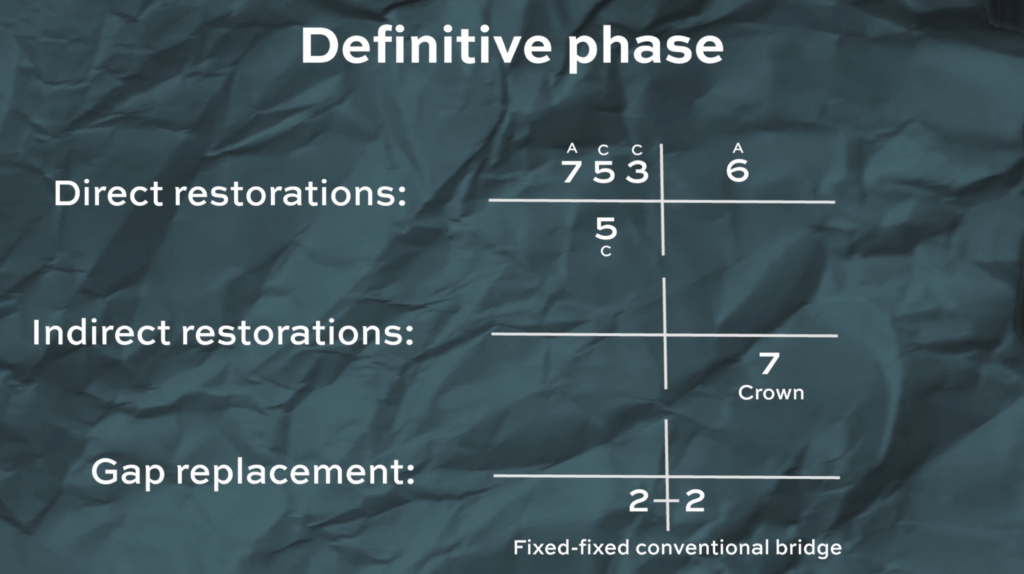
Definitive
The next phase of the treatment plan is the definitive phase or as others might call it the restorative phase. In this phase you’re looking to carry out any direct restorations which were previously stabilised with GIC, any indirect restorations like onlays or crowns and you’ll also treat any missing spaces with bridges, dentures or implants.
Direct restorations
So let’s start with direct restorations and the main ones are composite, amalgam and GIC. Now when you’re treatment planning you might not necessarily need to think specifically which material you’re gonna use for each filling but it’s nice to plan ahead so you can discuss and decide on the plan with your patient. Composite was first made to be used for anterior fillings but since they’ve gotten better and better each year, they’re now used for posterior fillings as well, especially outside the UK. But under the NHS, the first go to material for posterior fillings would still be an amalgam. Amalgams are good in posterior fillings because they’re stronger and more resistant to fracture, and the studies actually show they last longer than composites. Now let’s say there’s no NHS limiting your choice of material, what do yo use for a posterior filling? Let’s go through some things you should consider. One of the main factors is patient preference. No matter how much you tell the patient all the advantages of amalgam and that the risk with mercury is extremely low, if they don’t want a silver filling or they have a metal allergy, then the choice has been made – use composite. If the patient doesn’t mind having a silver filling, then you have to see how big is the cavity? If the cavity is quite small, then you’re going to struggle to get retention with amalgam, so your best bet would be composite. If you have a larger cavity to fill and maybe even need to replace a cusp, then you might want to think about amalgam. However, saying that, composites are getting better and better and many dentists will argue that composites are just as strong and even better than amalgam, and so you can and should use composite for larger restorations.
Indirect restorations
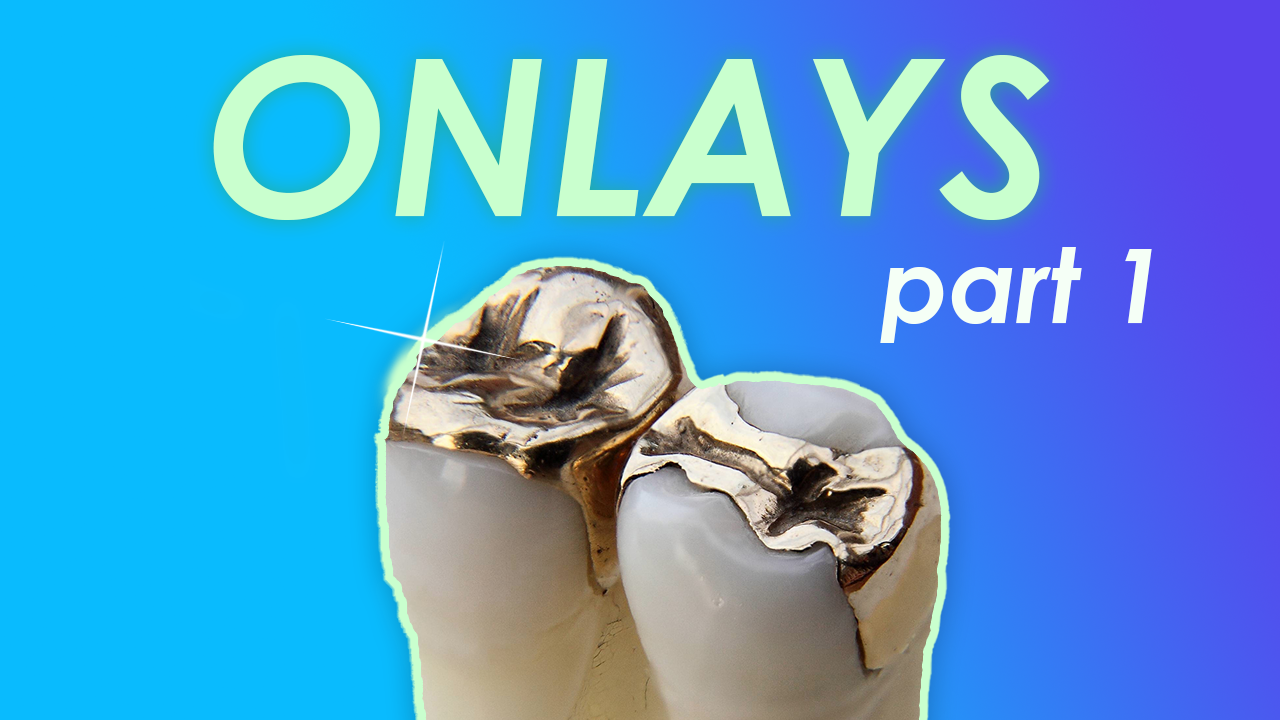
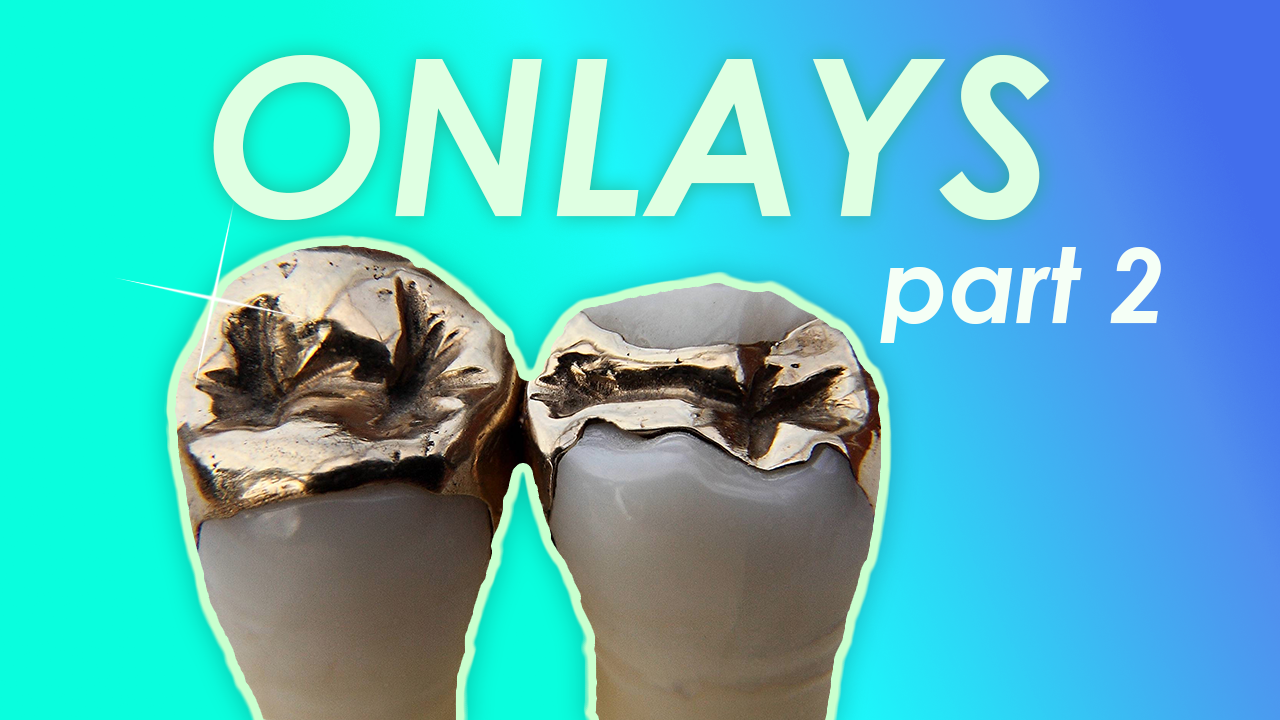
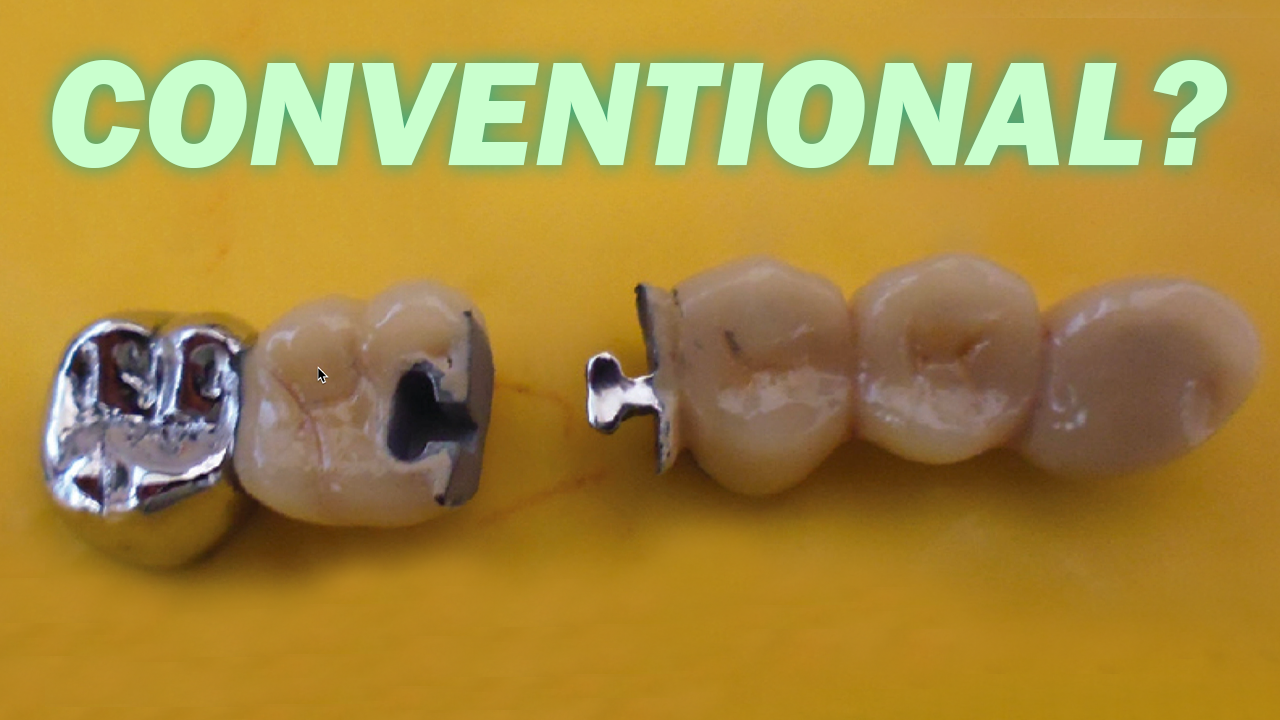
Moving on to indirect restorations, we have inlays, onlays and crowns. Indirect restorations are lab made and need to be bonded or cemented to the tooth. The first one is inlays which just covers the pits and fissures and to be honest you rarely do them. The idea is that they’re more resistant to abrasion and occlusal wear compared to a direct composite but they’re more expensive, they require more chair time from the patient, multiple appointments and quite fiddly to bond to the teeth because they’re so small. Now onlays, on the other hand have a lot more use. They basically cover one or more cusps of posterior teeth and in the book it says the official definition is that it covers up to five eighths and any more than that is a crown. Didn’t really need to know that, but now you do. Onlays are a more minimally invasive option to crowns and are used to provide cuspal coverage to strengthen the tooth, for example if it has a crack or after root canal treatment. They’re better than just doing a direct composite because a lab made onlay will be stronger and have better contours and contacts. And they’re better than crowns because they remove less tooth structure. Sometimes however there is so much tooth structure lost that you’re only option would be to do a crown.
Here we talked a bit about each option but check the document below where we have a table for the treatment options of the main tooth conditions.
Gap replacement
Now after indirect restorations, you can look to replace any gaps. The typical options are bridges, dentures or implants. Which one you go for here massively depends on budget, size of the gap and patient preferences. Bridges can be a great option for smaller gaps, dentures for bigger gaps and implants can be great for both if the patient can afford them. Again, there’s a table in the document which lays out the different treatment options for different gaps.
So how do you write all of this in your treatment plan? If there are multiple restorative treatments, you can use grids and list them out. Start with direct restorations, write all of the teeth that you plan to fill and maybe annotate what material you plan to use. Then note indirect restorations and annotate what the indirect restoration would be. And finally, any gap replacements and again what the gap replacement you plan to put in.
Maintainance
So after the definitive phase comes the Maintenance phase where you see the patient in regular intervals to monitor their oral health and to prevent any disease like caries from happening. The general advice is to have check ups with your patients every 6 months but you might need to see them more frequently if they were a perio patient or if you feel like they still haven’t fixed their diet or oral hygiene regime. In those cases, you might choose to review them every 3 months. This kind of thing changes case by case and is usually up to the dentist to look at the patient as a whole and decide how often they need to be seen.
In these appointments you’re looking at reinforcing oral hygiene instructions and diet advice, rep-prescribing fluoride toothpaste if necessary, re-checking BPE or redoing 6 point pocket charts if they were a perio patient, giving a scale and polish if they need it and taking updated bitewings according to the FGDP guidelines. You’ll also need to monitor anything else that you might have noted previously, for example, if there was a tooth you were unsure about in terms of whether it has caries or not, you’ll need to check that every appointment and document it.
If you found this blog post useful, check out some of the suggested blog posts below. If you have any questions please message us on Instagram @two.dentists !