If you prefer videos, watch the youtube video we made on this topic!
In this part of the educational series, we’re going to be covering everything you need to know about when taking a dental examination and special investigations you’ll need to know before going to see your patients for the first time.
In last weeks blog, we spoke about how to take a good history, so if you haven’t read that yet, we recommend you read that first and then come back to this blog where we’ll go through doing a thorough examination and some of the special investigations you might need to do to reach an accurate diagnosis.
We’re going to cover extra-oral (E/O) and intra-oral examinations (I/O), followed by charting and BPE and some other things that should be noted about tooth surface loss, occlusion and dentures. We’re also going to be talking about which investigations would be appropriate, so if you’re here for anything specific then feel free to scroll down. We’re also going to include a document below which covers content both this blog and last weeks blog on taking a history as well.
Let’s get started
So the exam starts when you see the patient for the first time and as you call their name in the waiting room, you want to be looking out for any disabilities, breathlessness, and their general appearance.
The formal examination starts when the history finishes and you’ve received implied consent to proceed by telling them for example: I’m going to start by having a feel around your head and neck to check for any lumps and bumps.
E/O
You start with the E/O examination by standing behind the patient and palpating with your fingers on the TMJ (temporomandibular joint), the MOM (muscles of mastication), the SG’s (salivary glands) and the LN’s (lymph nodes). With experience, you’ll be able to pick up more subtle details, but to help you understand if something is wrong, compare to the opposite side and if there’s any asymmetry. There are certain ways you can ask the patient to move to make the tissues you’re examining stick out more.
TMJ
So for example, with the TMJ, you ask the patient to open and close their jaw while palpating right in front of their ears and you want to look for any deviations and if there is a deviation to one side, this could indicate some sort of TMJ dysfunction. You also want to listen for any clicks or grinding and if there are any, you want to ask the patient if it hurts and if it does, then you need to work towards forming a diagnosis, whereas if it doesn’t hurt, I would record an asymptomatic click for example in my notes. I would also ask the patient to bring their lower jaw out and move it side to side, again looking for abnormalities.
MOM
Then from in front of the ears, I would run my fingers along the zygomatic process to have a feel of the masseter and as I ask them to open then close and clench, I would palpate along the masseter down to the mandible. Then I would move on to palpate the Temporalis by asking them to clench again and placing my fingers higher up near the temporal fossa. The reason we palpate the MOM is because they can refer pain to other locations in the head and this pain can be replicated while palpating them. They could also give us an indication of someone having a parafunctional habit like bruxism for example if these muscles are hypertrophic and then when you later move on to looking inside the mouth, you might see lots of TSL from attrition.
SG’s
Next, you have to palpate the parotid and submandibular SG’s and you can’t always feel these in patients without any pathology but it’s important to check them because if they’re large and swollen, they might indicate that there are salivary stones or sialoliths in the salivary glands. You can find the parotid just below and in front of the ear and you can find the submandibular gland just below the body of the mandible but above the hyoid bone.
LN’s
You also need to check the lymph nodes of the head and neck region to make sure that there are no infections or cancers in the area, which can be spotted by enlarged, red, and tender nodes. The 3 areas you need to check are the cervical nodes, the submandibular nodes and the submental nodes. It’s easy to check the cervical nodes by asking the patient to turn their head away from the side you’re checking so that the SCM can be pushed out and the cervical nodes are made more obvious when you run your fingers along their neck. The submandibular lymph nodes are just superficial to the submandibular SG so it’s easier to check them both at the same time and finally, the submental lymph nodes are most easily found by tipping the patients head forward and rolling the nodes along the lower border of the mandible anteriorly.
Cancer?
The last thing to watch out for extra-orally are skin cancers like BCC which look like red or pink raised, shiny, waxy ulcers with irregular blood vessels and could bleed from minor traumas. If you notice something like this it’s so important that you don’t just move on and instead, you need to ask the patient how long it’s been there for and if it’s been hurting them. BCC’s grow slowly over a long period of time and a lot of patients just leave them to grow for years so if you see something suspicious, you should refer them to oral medicine.
NAD
If there’s nothing wrong, in the notes I just write TMJ, MOM, SG and LN NAD. And this little circle means nothing abnormal detected.

I/O
Now that you’ve examined the outside of the head, it’s time to look into the mouth and you start by looking for anything abnormal in the soft tissues and the buccal and labial mucosa, the palate, the tongue, the FOM and the gingiva. On the mucosa, for example, you might see white lesions which could be presenting from a range of causes or you might notice bite marks on the occlusal plane or even red lesions or ulcers and loads of other stuff you’ll pick up in oral med. But the important thing is if you see anything that you’re unsure about, don’t ignore it.
Make sure you use the light to your advantage and reflect it off your mirror in the more difficult areas to see, like the back of the floor of the mouth and don’t be afraid to ask your patient to help you. For example, if you’re examining the tongue, ask the patient to stick their tongue out and move it left and right because these are areas where lesions can hide and are high-risk areas for malignancies, so it’s important to be thorough. The order I usually do this is first: If the patient is wearing dentures, I ask them to take it out and I ask the patient to open their mouth and using my mirror I start with one side and retract their cheeks and check their buccal mucosa, I then work around clockwise and check the lower labial mucosa, right buccal mucosa and then the upper labial mucosa. At the same time I am checking the mucosa, I also check the gingiva. I then examine the top of the tongue by asking the patient to stick their tongue out, then I look at the lateral borders of the tongue by asking the patient to stick their tongue to one side and then the other. And I check the floor of the mouth and ventral tongue by asking patient to stick their tongue to the roof of their mouth. And then I finish using my mirror to check the palate and tonsils.
Charting & BPE
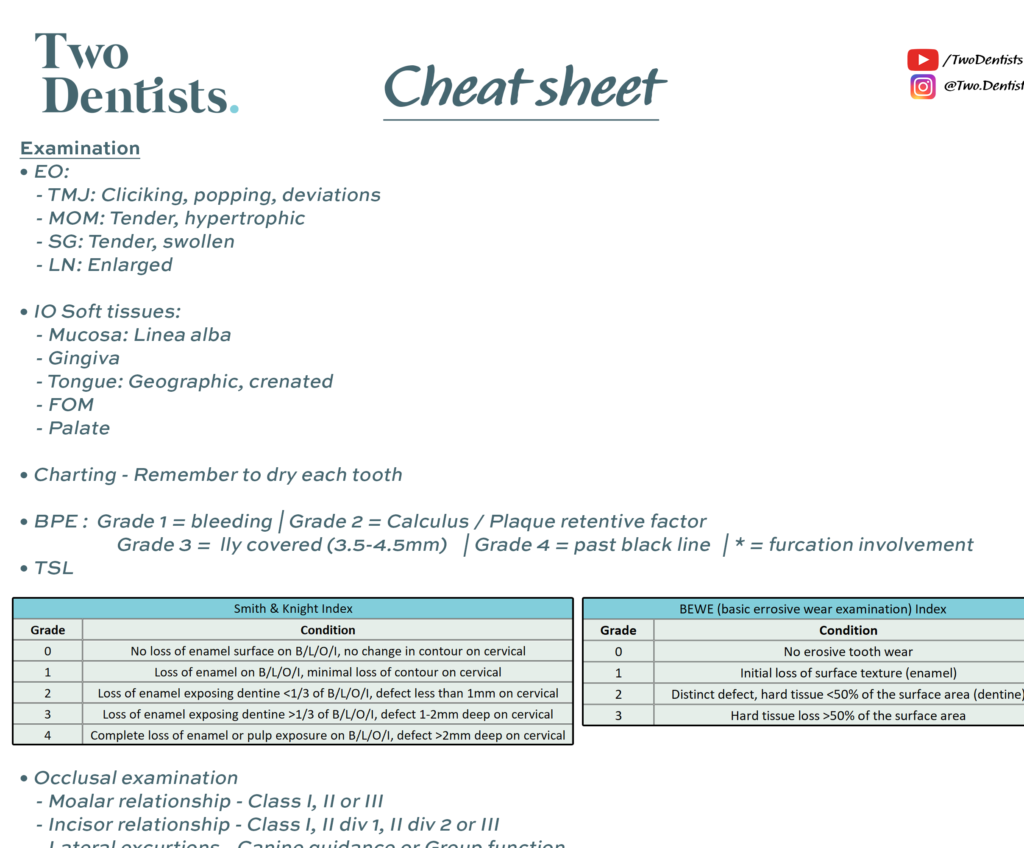
Then you want to do an intra-oral hard tissue (IOHT) exam which includes charting and a BPE where you record each tooth in detail noting down anything from caries to missing and I would dry the surfaces of the teeth while I go around in a systematic order so that it’s easier to spot any caries or well colour matched restorations. Some people question the use of loupes for the examination but I love it and feel like I can spot so much more with them on. In the future, we’ll release a blog reviewing different loupes so make sure to subscribe to our YouTube channel so that you don’t miss that. When it comes to doing the BPE I would walk the probe along the pocket, going around each tooth with my perio probe and I would record which site was the worst in each sextant and give it that grade accordingly. Some people stop checking the rest of the sextant when they see a BPE of 4, but you shouldn’t do that because you might also notice a furcation involvement if you carry on, which would make it a 4*. Pause it now if you want to see how the grading system works for a BPE.
TSL, Occlusion & Dentures
After you do your BPE, we think it’s a good idea to also make an assessment of any tooth surface loss. So I suggest you do a BEWE (basic erosive wear examination) or a Smith & Knight index. At this stage you can also check their occlusion, making a note of their molar relationship and incisor relationship. This is the bare minimum you should do but ideally, you would also check their left and right lateral excursions, noting whether they have canine or group function. I know this sounds like a lot, and most likely you might not do it when you first start seeing patients, but it’s good to get into the habit as early as you can. If they were wearing dentures, you can check their occlusion with and without the dentures. You also want to make a general note of the dentures stating whether they are partial or complete and whether they’re acrylic or cobalt chrome. If there are any problems you notice with the dentures you can ask more questions as well.
Special Investigations
Now that you’ve done the charting and BPE, you use this information alongside the patient’s complaint to decide which special investigations would be the most appropriate for this patient and here’s is a list of the main special investigations that you could do. Let’s go through each one so you can get a better idea of when you would do each one.
Radiographs
The first one I usually think about is what radiographs do I want. For new patients with no previous radiographs you instantly think bitewings. If they have previous bitewings, you need to check how long it’s been and if it’s time for updated bitewings. FGDP has guidelines on the intervals and I’m going to cover this in more depth in our radiographs blog next week. So subscribe to our YouTube channel so you don’t miss out. For periapicals, the list of indications are:
1. Heavily restored teeth (big fillings, crowns, abutments)
2. For periodontal disease
3. Teeth that are non-responsive to sensibility testing
4. Prior to indirect restorations
5. Prior to endodontics / extraction
6. Preliminary assessment of edentulous space prior to implants
For heavily restored teeth, the rationale is that you want to get a better idea of the status of the tooth. Is there any secondary caries, any apical pathologies, if it’s a crown, how is the marginal fit, if it’s an interproximal amalgam, is there a ledge, has the tooth been root treated? Finding out all this information will give you a better idea of the treatment that might be needed now or in the future and you can warn your patient about them. For perio you take PAs to assess bone levels and to be able to make a diagnosis. Taking a PA of a tooth that’s non-responsive to sensibility testing might give you an idea of why. So you might see signs of apical periodontitis. And you always want to take a PA before any root canal treatment, extraction or indirect restoration to help you with seeing the root shape, the status of periapical tissues and will help you plan the treatment. The main reasons for taking DPT would be to assess wisdom teeth and their association to the ID canal. They’re also useful for any pathologies like large cysts and also for ortho treatment planning.
Sensibility testing and TTP
You would also need to consider sensibility testing which could give you an indication of whether the tooth is alive or not and this is of 3 types. You can have hot, cold or electric. The most accurate type is cold sensitivity testing where you would place a freezing chemical like endo-frost on to some cotton wool and place it on to the tooth in question as well as the 2 adjacent teeth. The next most accurate is using electric pulp testing (EPT) where you would ask the patient to hold onto a metal electric conducting rod and place toothpaste on the patient’s tooth in question and then complete the circuit by holding the EPT machine on to the tooth through the toothpaste. Again you would test the 2 adjacent teeth as well so that you can see what the difference is between a possibly healthy tooth and a diseased tooth. This comparison is important because the patient might not be responsive to sensibility testing at all on any of their teeth because of secondary and tertiary dentine deposits but if the tooth in question responds in a way that is much different to the healthy comparison teeth, than this is indicative of disease. Just remember that this doesn’t mean the tooth is non-vital if it is non-responsive and you would write in your notes: tooth non-responsive to EPT, as opposed to tooth not vital because the pulp could still be alive. The last way of sensibility testing is with hot testing, by heating a gutta-percha (GP) point and placing it on the tooth, but this is the least accurate way of sensibility testing and is hardly ever used.
Here is a list of reasons to do sensibility testing and these are the same for testing percussion:
Deep fillings
Deep caries
Crowns- and abutments (if possible)
Heavily discoloured teeth (grey/pink)
History of trauma- fractures, subluxation, luxation, avulsed teeth (which has been reimplanted)
Heavily worn teeth
Teeth with a peri-apical radiolucency
Teeth near draining sinuses
Teeth with symptoms
Teeth that are tender to tap
Teeth with cracks/fractures
Severe periodontal bone loss
Prior to crown or bridge work
The way you test for tenderness to percussion or TTP depends on how much pain the patient describes they’re in. If it hurts a lot when they eat, for example, I would test it using my finger whereas if they were in that much pain I would tap it with the handle of my mirror. If it hurts, then I would record it to be TTP positive and if it didn’t that would be TTP negative and again I would also tap a few adjacent teeth for comparison.
Tooth slooth
Another special investigation to know about is using a tooth slooth and this is used when a patient presents with a cracked tooth or a suspected crack tooth and there are 2 places you should test, the fissures and each individual cusps. The way you use it is by placing the pointy end on the tooth in question and asking the patient to bite and hold, then release and ask them at what point it hurt them and then record that in your notes.
6PPC
Next we’ll talk about 6 point pocket charting (6ppc) as a special investigation indicated by BPE’s of 4 or persistent BPE’s of 3 even after initial periodontal therapy (which is a supragingival scale, OHI and then an 8-12 week wait). You would also do plaque scoring for any perio patient or any patient with poor oral hygiene.
Diet Diary
Another is taking a diet diary for any high caries risk patients or patients suffering from TSL and then analysing this so that you can give dietary advice when you see them next.
Study models
Taking study models is another investigation which helps to monitor progression of TSL but can also be used for complex or ortho treatments as a before and after and can be used to assess space for indirect restorations.
Diagnostic wax-up
The last special investigation to consider is a diagnostic wax-up to help visualise a composite build-up case.
What we’ll be covering next week
That was everything you need to know about taking a dental examination and special investigations at this stage. In the next blog, Zoh will be talking in more depth about how to read and report on radiographs, so subscribe to make sure you don’t miss out. Don’t forget to download the document below for the cheat sheet.
Check out our other content
If you’re interested, feel free to check out our other Blogs, our Instagram page, or our YouTube channel for more.